- Pizza Stone for Solymac Oven
- Pizza stone for oven BAKERS PRIDE
- Pizza stone for BARTSCHER oven
- Pizza stone for Cookmax oven
- Refractory stone for CUPPONE pizza oven
- Pizza stone for FIMAR oven
- Pizza stone for GAM oven
- Pizza stone for oven GGF
- Refractory Stone for Italforni Pizza Oven
- Pizza stone for Moretti oven
- Refractory Stone for OEM Pizza Oven
- Pizzagroup Refractory Stone
- Refractory Stone for Prismafood Pizza Oven
- Pizza stone for oven RESTO ITALIA
- Pizza stone for Tornati oven
- Pizza stone for ZANOLLI oven
- Pizza stone for ZANUSSI oven
- Refractory stone for gas oven
- Refractory stone for pizza oven FORNITALIA
- Refractory stone for Rinaldi Superforni pizza oven
- Refractory stone for electric oven
- Matricola ML 44 Refractory Stone for Oven
- Round Refractory Stone for Pizza Oven


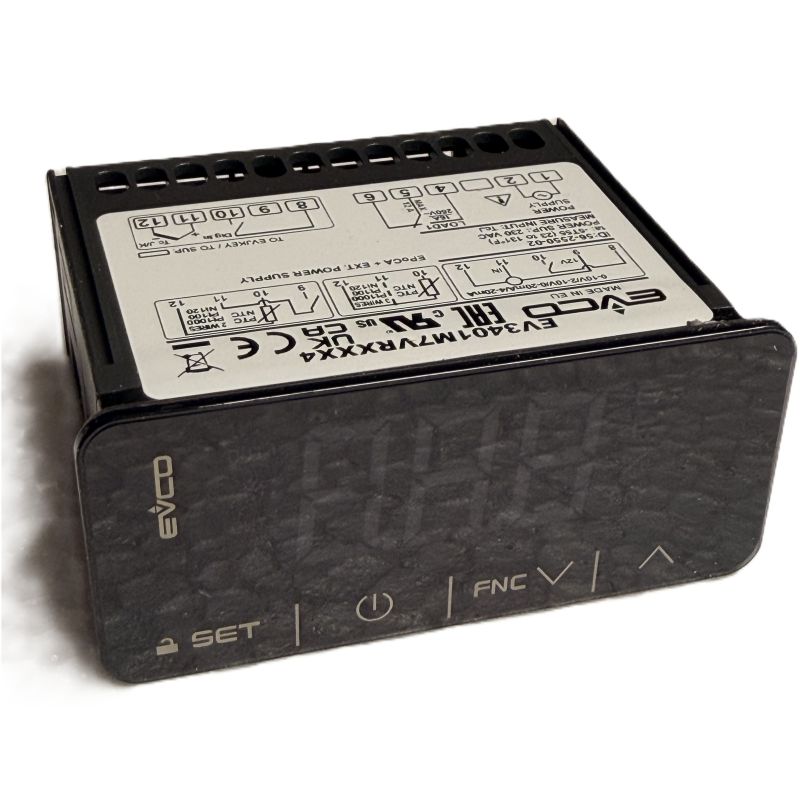

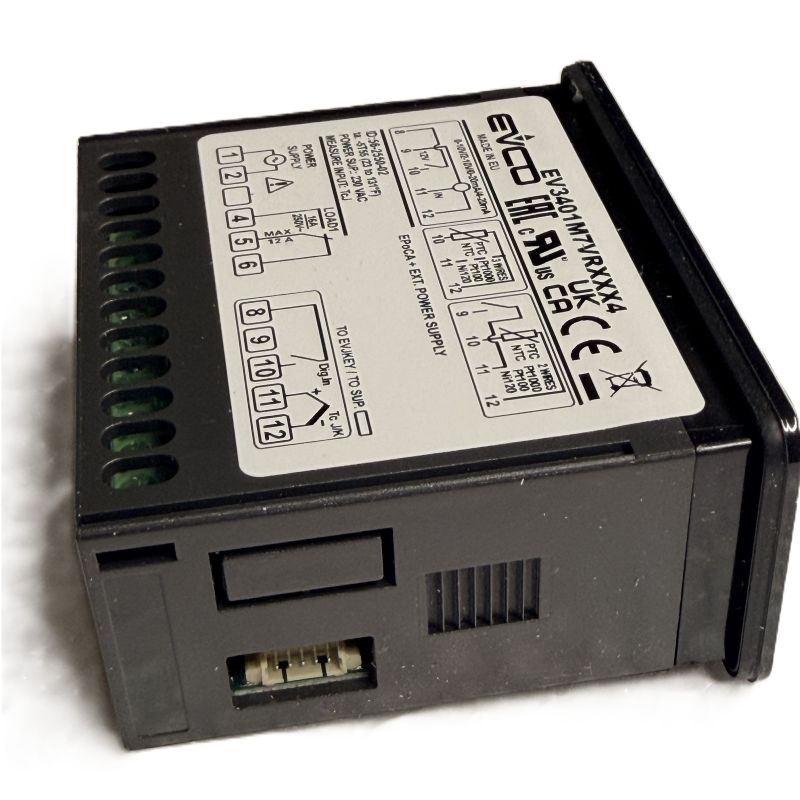
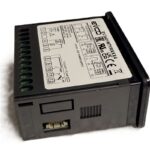

The EVCO EV3401M7VRXXX4 temperature controller is used on certain configurations of professional ZANOLLI ovens.
For ZANOLLI, this spare part corresponds to reference TERM0116 and replaces the previous TERM0060 reference.
The EV3401M7VRXXX4 reference is printed directly on the EVCO controller label. This makes it easier for the customer or technician to check the reference of the installed controller before ordering a replacement.
TERM0116 can be used, in particular, on certain ZANOLLI 08/50 electric oven configurations and on ZANOLLI CITIZEN GAS PW ovens originally fitted with TERM0060.
Important: the temperature controller must be correctly parameterized for the exact oven model. The maximum temperature specified by the oven manufacturer must always be respected.
How to identify your temperature controller
Before ordering, check the label on the temperature controller.
The current replacement part carries the reference:
EVCO EV3401M7VRXXX4
Corresponding ZANOLLI reference:
TERM0116
Previous ZANOLLI reference replaced:
TERM0060
An older EVCO controller identified in these applications may also carry the reference:
EVCO EVK411M7VHBSX01
The identified controllers also show the following information:
- power supply: 230 VAC
- measurement input: TCJ
- corresponding probe type: type J thermocouple
TERM0116: the ZANOLLI spare part reference
TERM0116 is the reference used by ZANOLLI to identify this spare part.
This reference may appear in ZANOLLI exploded diagrams and spare parts documentation. However, it is not always directly visible to the oven owner.
By contrast, the EVCO EV3401M7VRXXX4 reference is printed directly on the controller label. It is therefore particularly useful for identifying the component already installed in the oven.
The ZANOLLI TERM0116 reference replaces the previous TERM0060 reference.
Compatibility with ZANOLLI ovens
This temperature controller may be suitable, in particular, for:
- certain ZANOLLI 08/50 electric ovens, with parameter settings adapted to the specific oven
- ZANOLLI CITIZEN GAS PW ovens originally equipped with a TERM0060 temperature controller
However, ZANOLLI has used different temperature control systems depending on the oven model, version and production generation.
Therefore, the designation 08/50 or CITIZEN GAS PW alone is not sufficient to guarantee compatibility.
Before ordering, check the exact oven model and the references shown on the controller currently installed.
A temperature controller that must be configured for the oven
The EVCO EV3401M7VRXXX4 / ZANOLLI TERM0116 must be parameterized for the oven in which it is installed.
A controller configured for one oven model must not automatically be considered correctly configured for another model.
The configuration includes settings such as:
- probe type via P0
- measurement unit via P2
- heating or cooling regulation mode via r5
- minimum setpoint limit via r1
- maximum setpoint limit via r2
Before commissioning the oven, always check that the controller configuration matches the specific oven.
Important: respect the oven’s maximum temperature
The maximum temperature specified for the exact oven model must always be respected.
The temperature range that the EVCO controller can technically display or manage does not necessarily correspond to the maximum temperature permitted for the oven.
Therefore, never determine the oven’s maximum operating temperature solely from the adjustment range of the EVCO EV3401M7VRXXX4.
The maximum setting must comply with the technical specifications and requirements of the relevant oven model.
IMPORTANT – CORRECT PARAMETERIZATION IS REQUIRED
Always check the temperature controller settings before commissioning.
In particular, verify the probe type, regulation mode and temperature limits.
The maximum temperature specified for the oven must always be respected, even if the controller technically allows a higher value to be selected.
If in doubt, have the configuration and installation checked by a qualified technician.
How to set the maximum temperature limit on the controller
Parameter r2 defines the maximum selectable setpoint available to the user during normal operation.
The temperature setpoint SP is limited by the values r1 and r2.
Therefore:
SP = operating temperature setpoint selected by the user
r1 = minimum setpoint limit
r2 = maximum setpoint limit
The EVCO documentation gives 350°C as the default value for r2.
However, this factory value does not define the maximum temperature permitted for the ZANOLLI oven.
The controller technically allows r2 to be configured up to 999°C, but this does not mean that the oven may be operated at this temperature.
How to access parameter r2
To change the maximum setpoint limit:
- Press and hold SET for approximately 4 seconds.
- PA appears on the display.
- Press SET.
- Use ▲ / ▼ to enter the PAS parameter value.
- The default EVCO PAS value is -19.
- Press SET. The display then shows SP.
- Use ▲ / ▼ to scroll through the parameters until r2 is displayed.
- Press SET to display the currently stored value.
- Use ▲ / ▼ to set the required maximum setpoint limit.
- Press SET to save the new value.
- Press and hold SET for approximately 4 seconds to exit the configuration menu. The procedure also exits automatically after approximately 60 seconds without any action.
How r2 works
If r2 is set to the appropriate maximum value for the oven, the user will not subsequently be able to select an SP value above this limit during normal operation.
The r2 value must be determined according to the oven specifications, not according to the maximum temperature range technically supported by the controller.
Do not increase r2 without first checking the maximum permitted temperature for the exact oven model.
How to set the cooking temperature
Once the controller has been correctly parameterized, the user can normally adjust the SP temperature setpoint.
To change the temperature:
- Make sure the keypad is unlocked.
- Press SET.
- SP appears on the display.
- Use ▲ / ▼ to select the required temperature.
- Press SET again to confirm.
If no button is pressed for approximately 15 seconds, the selected value is also stored automatically.
The selectable temperature remains within the r1 and r2 limits defined in the configuration.
Do not confuse SP with r2:
- SP changes the operating temperature setpoint during normal use
- r2 defines the maximum setpoint the user is allowed to select
Unlocking the keypad
After a period without operation, the keypad may lock automatically.
The display shows:
Loc
To unlock the keypad, press a key for approximately 1 second.
The display shows:
UnL
The setpoint can then be adjusted again.
Displaying the measured temperature
The EVCO EV3401M7VRXXX4 also allows the temperature measured by the regulation probe to be displayed.
To view it:
- Make sure the keypad is unlocked.
- Press and hold ▼ for approximately 4 seconds.
- Use ▲ / ▼ to select Pb1.
- Press SET.
Pb1 corresponds to the temperature measured by the regulation probe.
Pr1 probe alarm
The Pr1 code indicates an alarm relating to the regulation probe.
In this case, check in particular:
- parameter P0
- condition of the probe
- electrical connection of the probe
If the alarm appears after replacing the temperature controller, do not change parameters randomly.
First check the configuration, probe and wiring.
Technical specifications
| Specification | Information |
|---|---|
| Product | Electronic temperature controller |
| Controller manufacturer | EVCO |
| Current EVCO reference | EV3401M7VRXXX4 |
| ZANOLLI reference | TERM0116 |
| Previous ZANOLLI reference | TERM0060 |
| Older EVCO controller identified | EVK411M7VHBSX01 |
| Power supply shown | 230 VAC |
| Measurement input shown | TCJ |
| Probe type shown | Type J thermocouple |
| Display | Digital |
| Setpoint adjustment | SET + ▲ / ▼ |
| User setpoint | SP |
| Minimum setpoint limit | r1 |
| Maximum setpoint limit | r2 |
| Default EVCO password | PAS = -19 |
| Parameterization | Must be adapted to the oven model |
Installation and commissioning
Replacing the temperature controller involves the oven’s electrical circuit and temperature regulation system.
Before carrying out any work, disconnect the appliance from the electrical power supply.
After installation and before commissioning, check in particular:
- probe type
- regulation mode
- r1 and r2 limits
- configured maximum temperature
- whether the controller configuration matches the oven model
Electrical connection, parameterization and commissioning should be carried out by suitably qualified personnel.
Do not restore the controller to its factory settings in an attempt to solve a configuration problem without first checking the parameters required for the oven.
The EV3401M is a configurable controller and its settings must correspond to the application.
Unsure about compatibility?
Before ordering, please send us, if possible:
- the exact oven model
- a photo of the oven rating plate
- a photo of the old temperature controller label
- the EVCO reference visible on the controller
- if necessary, a photo of the electrical connections
This information helps us identify the installed version and check the appropriate replacement part.